
I was contacted by DHG a few months ago; they offered me the opportunity to collaborate together to introduce their new product, silk tulle. I gladly got to know this material better by studying its characteristics and testing out the possible outcomes with the nuno felting technique. Ever since I first came into contact with this technique, I was fascinated by how light you can make the fabrics, so much so that I make it an integral part of my creations. This is why I prefer working with thin fabrics with a wide weft as they allow me to create a nuno felt that is as light and airy as possible.
So, I was particularly keen on their offer, seen as I have been looking for a very light but strong silk fabric, as one of the drawbacks of silk gauze is it's rather fragile.
From the moment I held the tulle in my hands, it was love at first sight. Anyone who works with their hands can tell you how important tactile sense and the interaction that is created between our hands and the material that were about to manipulate is. As well as being light, tulle is extremely soft to the touch, flexible and like I said before its strong. But what really makes it stand out is by far its transparency.
In my opinion the most interesting aspects are:
The very wide weft allows the wool to soak internally easily and felt well as well as rapidly even when used in several layers and mixed or overlaps other materials. This allows us to create very different textures from a textured aspect and interesting contrasts between transparency and density.
Out of the various samples produced during my study, I chose two that bring out these characteristics of tulle and that I hope will encourage you to experiment. In the first texture were going to look at how it reacts together with natural fibres to create solid fabrics. Instead in the second one, how to intensify its lightness and transparency. Before getting started with the tutorial Id just like to point something out: the information that youre going to read is the result of personal experimentation and is therefore subjective. Whilst were experimenting, we all find a method to suit us, customizing them how we think best.
MATERIALS
Silk tulle 220cm x 140cm
A1 Mulberry silk tops approx 10-15 g / 0.3-0.5 oz
Tops Ramie approx 5-10 g / 0.2-0.5 oz
Extra fine merino wool tops approx 15-20 g / 0.5-0.7 oz
Bubble wrap or a plastic sheet big enough to protect the work surface
2 pieces of bubble wrap bigger than the size of our sample were going to make approx. 80cm x 80cm
Scissors
Felting water sprinkler
Felting roller
Rubber bands
Non-abrasive soap
A basin
Towels
METHOD
We're going to lay out the decorative layer, in this case, made up of tulle and silk and ramie fibres, thatll be in contact with the work surface and then the wool one, which is the back of our final fabric. Our composition will look inside out. Its important to lay the wool out after having arranged the decorations as were going to use it like a glue in small quantities. Leaving the other fibres and the tulle on show. Like this, we can check its coverage without overdoing it where its not needed.
Get the work area ready and arrange one of the two pieces of bubble wrap with the bubbles facing up. Take the tulle and cut it into 4 45cm x 140cm pieces.
Start by laying out the silk and ramie fibres into quite thick tufts, shaping them as you prefer (you can use any natural fibres available on the market) and space them out next to each other (fig. 1).

 Fig. 2
Now cover them with one of the pieces of tulle that you have got cut out, place it with the short side towards you and add other fibres on top (fig.2). Do it in a way that theres a bit of space between the rows of fibre. At this point the ruffle up the tulle creating quite defined folds whilst incorporating the fibres inside (fig. 3).
 Fig. 3
Part of the fibres will be above the tulle and the rest underneath. Given the length of the tulle you can do this step in two phases, first by manipulating one part of the fabric and then the other. (fig. 4/5)
 Fig. 4
 Fig. 5
Now place the second piece of tulle next to the one before in order to create continuity and repeat the same steps (fig. 6).
 Fig. 6
Repeat the same procedure for the rest of the pieces of tulle, gradually continuing your composition by putting them near each other (fig. 7/8).
 Fig. 7
 Fig. 8
You can vary the texture by
mixing or overlapping the tulle with other light fabrics and changing the
direction and shapes of the ruffles (9/10/11) Fig. 9
 Fig. 10
 Fig. 11
Once the decoration layer is finished, it will be about 45cm by 45cm, go on with the wool one. Place a thin but compact layer of wool down gently, proceed with a coat of tufts placed at 45 degrees, at right angles to each other, alternating the direction one piece at a time (fig. 12/13).
 Fig. 12
 Fig. 13
Leave about a 5cm border around the project (fig. 13).
 Fig. 14
Now cut out a 35cm x 35cm piece out of the left over tulle and place it on top of the layer of wool (fig. 14). This will be the back of the nuno felt fabric and adds better resistance and finish by covering the layer of wool.
 Fig. 15
Once all the layers have been coated you can start felting. Wet it with warm water and soap, using a small felting water sprinkler and cover the project with another piece of bubble wrap, this time with the bubbles facing down. Wet the surface a little bit to make it easier to slide your hands up and down (fig. 15) and start massaging applying a bit of pressure so the water seeps through into the fibres.
 Fig. 16
Now wrap all of it around something tube-shaped and start taxiing gently at first then harder so that the wool fuses into the tulle. After a bit unroll it and check it and rearrange the fabric if necessary. Change direction and continue rolling. Repeat this process until the wool fibres cant move around and have a certain stability. You can check with your fingers that the layers arent sliding about, this means that the wool fibres have gone through into the tulle and by clinging on to it they have fused together with the other natural fibres. At this point the sample will have undergone a part of the final shrinkage.
You can now go on to the beating phase, manipulating and beating the fabric on the table to give the fibres more firmness. The surfaces on both sides will gradually shrivel due to further shrinking (fig. 16/17).
 Fig. 17
 Fig. 18
Lastly rinse and let it dry. The final size of the sample will be about 30cm x 30cm with a shrinkage percentage of about 35% (fig. 18/19).
 Fig. 19
 Fig. 20
Comparing the texture after being felted with the initial one, we can see that overall, its quite flat compared to what we expected. Most of the folds that you created are stuck together and fused to the wool blending with the other natural fibres (fig. 20/21/22). This is because tulle has a really wide weft and the wool migrates through the layers easily.
 Fig. 21
 Fig. 22
 Fig. 23
Now you can choose whether to leave it like this for a more textured look or make it more 3-d and lightweight. If you go for the second option, you need to carefully lift up the folds that are embedded into the wool, detaching them gently from the surface. I advise doing it with some dry or slightly damp fabric. If the folds are crammed together, like in this case, its easier to spot them and to start from the edges where they are more visible (fig. 23/24).
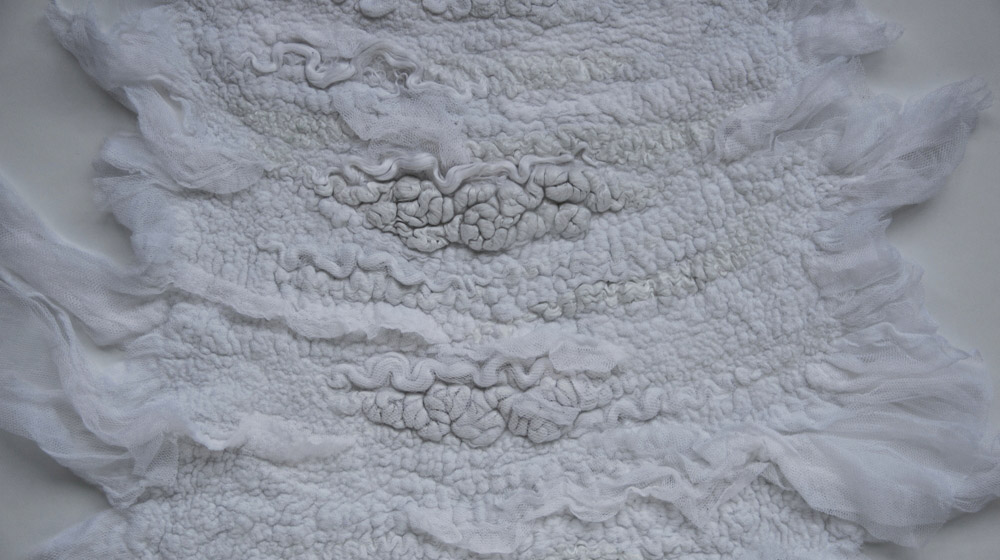 Fig. 24
 Fig. 25
Carry on lifting the easiest ones to see up and then the more hidden ones until you get the desired result (fig. 25/26).
 Fig. 26
As you can see all the materials are embedded, fused together in line, thanks to the wide weft of the tulle that allows the wool to migrate easily from one material to another. Some fibres are easier to see whilst others are covered up by the tulle but are still visible due to its transparency (fig. 27). Weve obtained a contrasting texture between density and lightness.


WRITE A COMMENT