
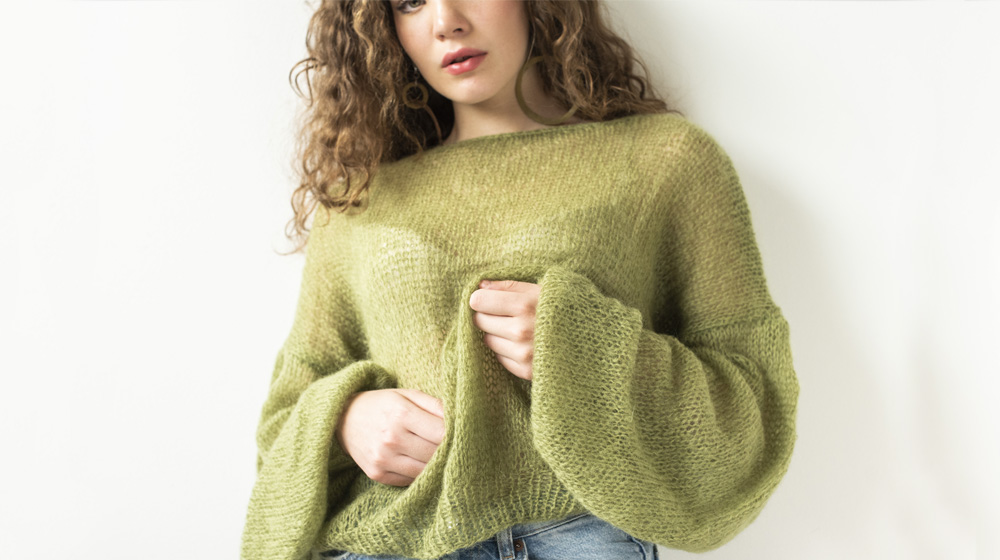
If you're someone who is only just beginning to knit or if you simply need a quick but classic project, we offer you a pattern for an extremely easy knitted sweater. This garment is in fact made with a stockinette stitch. The sweater has a loose, soft fit. The lines are basic; therefore, it can be used for many different occasions. It is somewhat transparent, however, if additional threads are used when knitting the sweater will be made less transparent. Knitting it is sure to be fun, though wearing it even more so!
The yarn selected is Fluffy in mohair and silk. The Fluffy rans used comes in a wide range of colours, so choose your favourite nuance from our shop.
Let's begin.
GAUGE
10 cm x 10 cm / 4 x 4
12 stitches and 15 rows
STITCHES USED
Stockinette stitch:
knit 1 row and purl 1 row
Rib stitch 1/1:
knit 1 and purl 1, in the following row knit 1 on the knitted stitch and purl 1 on the purled stitch.
SIZE
M
LEVEL OF DIFFICULTY
Easy

Using needles n° 4.5 cast on 55 stitches and rib stitch 1x1 for 13 rows.
At this point continue using needles n° 7 / 11 US.
Row 14: knit3 , from the 4th increase one stitch every 2 stitches until you reach a total of 80 stitches. Don't increaase on the last 3 rows.
From row 15 to row 79: Knit all rows with Stockinette stitch, placing a marker on row 49 to signal where the sleeve needs to be added.
row 80: bind off the first 5 stitches and continue to knit the row
row 81: bind off the first 5 stitches and continue to purl the row
row 82: bind off the first 5 stitches and continue to knit the row
row 83: bind off the first 5 stitches and continue to purl the row
row 84: bind off the first 5 stitches and continue to knit the row
row 85: bind off the first 5 stitches and continue to purl the row
row 86: bind off the first 5 stitches and continue to knit the row
row 87: bind off the first 5 stitches and continue to purl the row
row 88: bind off the first 5 stitches and continue to knit the row
row 89: bind off the first 5 stitches and continue to purl the row
row 90: bind off the first 2 stitches and continue to knit the row
row 91: bind off the first 2 stitches and continue to purl the row
row 92: softly bind off the remaining stitches.
Using needles n° 4.5 cast on 55 stitches and rib stitch 1x1 for 13 rows.
Continue using needles n° 7 / 11 US.
Row 14: knit3 , from the 4th increase one stitch every 2 stitches until you reach a total of 80 stitches. Don't increaase on the last 3 rows.
From row 15 to row 79: Knit all rows with Stockinette stitch, placing a marker on row 49 to signal where the sleeve needs to be added.
row 80: bind off the first 5 stitches and continue to knit the row
row 81: bind off the first 5 stitches and continue to purl the row
row 82: bind off the first 5 stitches, then knit 20 and bind off the 20 stitches to start the front neckline and continue separately to knit the row using mirroring method
row 83: bind off the first 5 stitches and continue to purl the row
row 84: bind off the first 5 stitches of the armhole and knit until the 3rd last stitch, knit 2 together and stitch the margin. knit the other part of the neckline in the same way
row 85: bind off the first 5 stitches and continue to purl the row
row 86: repeat row 84
row 87: bind off the first 5 stitches and continue to purl the row
row 88: repeat row 84
row 89: bind off the first 5 stitches and continue to purl the row
row 90: bind off the first 2 stitches and continue to knit the row
row 91: bind off the first 2 stitches and continue to purl the row
row 92: bind off the remaining stitches.
Using needles n° 4.5 cast on 35 stitches and rib stitch 1x1 for 13 rows.
Continue with needles n° 7 / 11 US.
Row 14: knit all in double stitch until you have a total of 70 stitches.
Stockinette stitch for 70 rows and softly bind off.
Sew the shoulders.
With Crochet hook 3.5 EU / E-4 US work 1 round of single crochet.
At this stage all that's left to do is to sew the sleeves from stitch marker to stitch marker and sew the body of the sweater.
We have come to the end of the tutorial on how to easily create a simple knitted sweater, if you enjoyed working with our yarn and want to discover other designs using Fluffy yarn we suggest reading this tutorial.


WRITE A COMMENT