Combed wool, the way I see it.
- Contrary to what may happen when working with carded wool, understanding which way the fibers run inside the combed ribbon is very easy, because combed wool runs in one way only. So, it won't be hard to figure out how to lay it out. Combed wool is perfect for light, uniform layouts. It may require more time than carded wool but it gives you more control.
- Learn how to lay out precisely small, identical amounts of wool, making sure there are no thicker or thinner areas. It won't be easy at first, but if you pay a little bit of attention it will become more natural with time. Like when working with carded wool, please remember to change the direction of the fibers with every layer: if you lay them vertically in the first layer, the second one has to be horizontal.
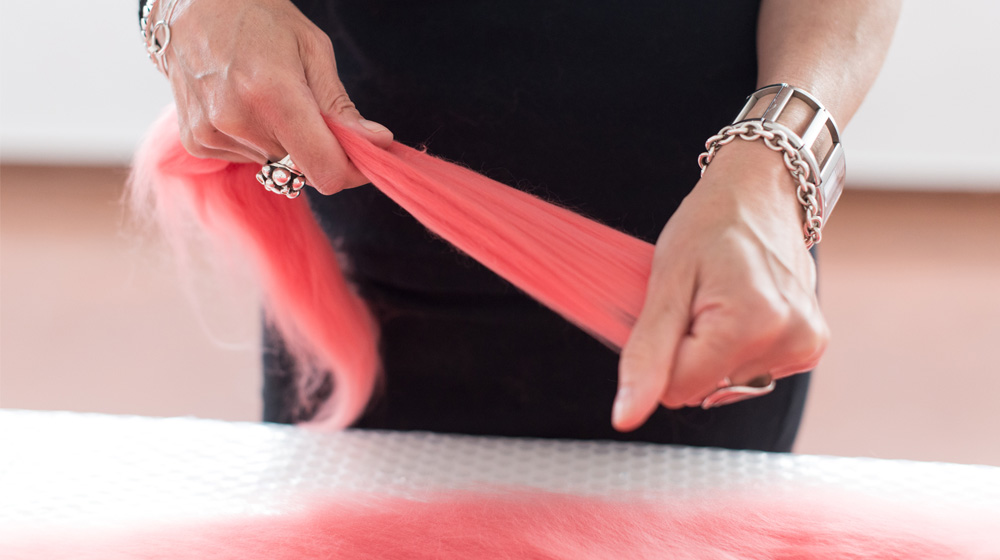
- When you lay out the fibers, hold the ribbon in one hand, paying attention not to squeeze it to tightly and to keep your hand a few inches away from from the outer fibers. Use the other hand to pick up small quantities of combed wool.

- Combed wool becomes felted along the direction of the fibers. In order to understand this better, I recommend you do an interesting exercise: make a panel by laying out only one vertical layer (or only a horizontal one, or a diagonal one), and felt it. This way, you will be able to confirm what I just said and, more importantly, you will be able to appreciate the interesting effects you can obtain with this technique. The only negative aspect of this technique is that it's not possible to obtain panels of regular shape.
- I recommend you lay out the wool on a piece of bubblewrap, with the bubbles facing up. Leave at least 10cm of clear surface on each side (in fact, if you can, leave a good 30cm free, with no wool on top, and use that extra space as a base to roll up your work).
- For very thin pieces, it is a good idea to lay out the combed wool over a thin polythene veil on top of the bubble wrap, and cover it with another veil once it is laid out and wet. This thin layer of felting-resistant material will allow you to roll up even the thinnest wool layers.

- Be careful how you make the fibers wet: use a tool to vaporize lukewarm water, and do not spray too much because if you make the fibers too wet they will end up "soaked" and you will lose control of the felting process. With the palm of your hands, or with a flat, broad tool, shortly massage the wool that is firmly kept in between the two polythene layers, making sure that no fibers remain dry. One the fibers are compacted, start rolling up the piece, delicately at first, then more vigorously.
- If you use other fibers in addition to wool please remember that silk and vegetable fibers do not get felted if combined with wool! I suggest you should lay them out on top. However, you can always start out by laying out special fiber, and then cover them with combed wool. Again, I recommend you do a few experiments to understand which solution you prefer.
- Regularly check that everything is going according to plan, and if the layer moves around or there are any wrinkles, fix the problem before you continue rolling.
- Use warm water, I like it nice and hot, once the fibers are felted: the fulling process will be quicker.
- If you want to work with nunofelt, carefully choose both the fibers and the fabric: the looser the fabric, the easier it is to make fibers stick; the thicker the wool, the quicker the felting.
- Wool Gauze e Silk Chiffon are the easiest fabrics to work with: the fabric is going to serve as a base, and is going to tend to disappear, blending into the felt. More compact fabrics such as Seta Pongee will give interesting effects thanks to the contrast between the opacity of the wool and the shiny look of the fabric.

Beyond technique
And now for a few recommendations that go beyond technique.
Never stop experimenting, keep up-to-date, study the work of other felt makers, try to understand how the pieces you love are made. Attend courses, read, follow Facebook, Pinterest, or Instagram boards. Try to make pieces in the style of artist/artisans that inspire you, but in the end try to understand what you really like and what you are best at. You will find your own unique style.
Respect other people's work, be thankful to those who taught you something, whoever they are. Sometimes the best ideas come from looking at a beginner at work, or mixing different skills.
And lastly: less is more, a clean design is better. It may seem kind of banal, but it always works!
Is there anything else you are curious about?
Eva Basile
Note well: all the images added in this article, except the last one, are taken from the video "From fiber to art - DHG art film", in collaboration with gentle Andrea Graham.
If you liked this article maybe you would also enjoy DHG exclusive interviews: Moira Bateman


WRITE A COMMENT