
The kind of wool I mostly use in my felt creations is merino wool. During the four years I sold felted wearables at craft shows, galleries and museum stores, merino wool was the only fiber I used to make very light and soft nuno felted wearables with a nice drape. Although many felters around me were using coarser wool to make accessories such as bags, I was still using merino wool instead. Ive always found merino a nice fiber to achieve less hairy surfaces that look almost like suede, which has always been my goal.
Ive used all kind of merino wool, ranging from 14-22 microns, and as a form of batt and roving. While making wearables, I always found the use of roving the easiest way to lay out wool, while merino batts have always been my favorite for jewelry. Ive also experimented with other techniques such as how to mark prefelt with rust.
About two years ago I decided to stop making wearables and decided to explore the possibilities of using felt as my main medium to make visual and conceptual work. One of my main goals is to raise awareness of many of the issues that are affecting our society, one of them being climate change. During the last two years Ive developed a series of pieces that focus on water issues. Based on this topic I created a collection of pieces with a lot of cracks on the surface to make it look like mud cracks caused by water scarcity. Even during that shift to a new body of work, my preferable fiber was still merino wool.

Since I have never used coarse wool to create the crack effects on the felt, I was very curious to see what the results were going to be, especially when it comes to controlling the hairy surface around the cuts. So for the trial, I made two identical samples using Maori batt (27 microns) and Extra Fine Merino batt (19 microns). Maori is a blend of New Zealand carded wools (typically Coopworth and Corriedale) and it supposed to be a very sturdy fiber for needle felting, felted bags, boots, and more.
Since I have never used coarse wool to create the crack effects on the felt, I was very curious to see what the results were going to be, especially when it comes to controlling the hairy surface around the cuts. So for the trial, I made two identical samples using Maori batt (27 microns) and Extra Fine Merino batt (19 microns). Maori is a blend of New Zealand carded wools (typically Coopworth and Corriedale) and it is supposed to be a very sturdy fiber for needle felting, felted bags, boots, and more.

I started by selecting the colors of the samples. To make it less confusing I used two different colors for each samples.
Then I separated the layers to see how dense the batt was. In the pictures you can appreciate that the fibers in the Maori batt seem to be denser that in the Extra Fine Merino batt, but also the fibers in the Extra Fine Merino batt are longer than the Maori batt. While I was separating the layers, I also noticed that the layers in the Extra Fine Merino batt were easier to separate, and the layers looked more even than those in the Maori batt.


I started laying out both samples at the same time. Each sample was 30cm x 30cm and 20 grams of fiber.

I first lay out 10 grams for each sample in perpendicular and horizontal layers. Once I am done laying out the base color or the color that I will see through the cracks, I use masking or painter tape right on top of the wool in order to achieve the wider cracks. In this case, I used blue painter tape. Instead of cutting long strips of tape, I cut small pieces and I overlap them while curving them at the same time. Once I decided the directions and the amount of cracks, I lay out the second layer of wool (additional 10 grams). The more contrasting the colors are, the more dramatic the cracks will be.


After felting both pieces, I was ready to start cutting and removing the blue painter tape. Leaving the tape a little extra larger than the actual piece makes it easier to find the tape and start cutting. Before starting to cut, I make sure I know the path and the direction, and always stay in the center of the tape so both sides of the cut have the same width.


Once the tape is removed, I continue felting the samples so the fibers that were under the tape can be felted. This additional felting also helps with the healing of the cuts.

Once the tape has been removed, the inside has been felted and the cuts have been healed, I start making the tiny incisions only through the upper layers. Its essential to use very sharp scissors to make quick and small cuts.
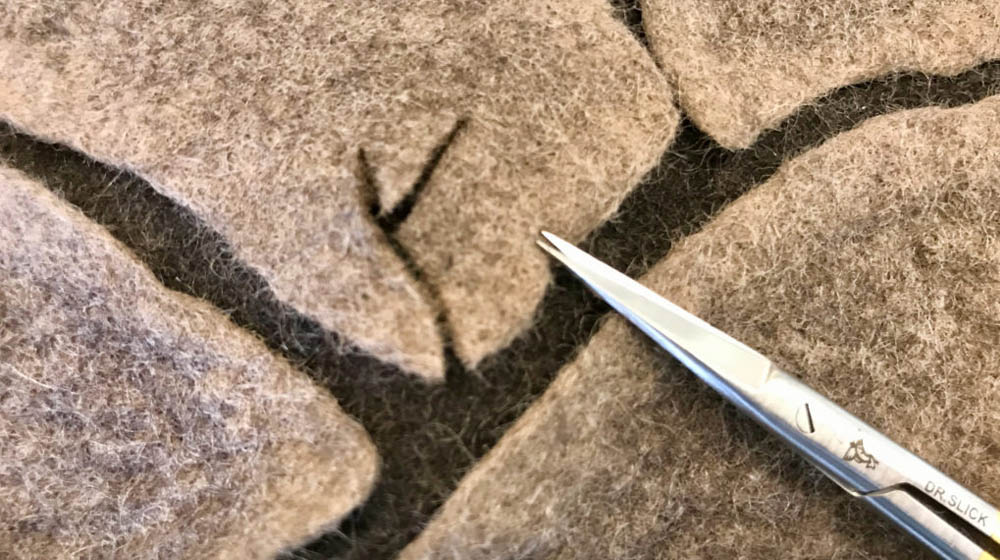
After making the small incisions, I use the same sharp scissors to trim the excess amount of fibers in the cuts.


It was great to experiment and play with a fiber I had never used before. My next goal is to continue using it, maybe mixing it with the Extra Fine Merino wool tops to reduce the hairiness of the surface.
If youd like to continue learning more about carded wool and how its felted, then we definitely suggest reading this article: Gladys Paulus compares bergschaf and extra fine merino.


WRITE A COMMENT