
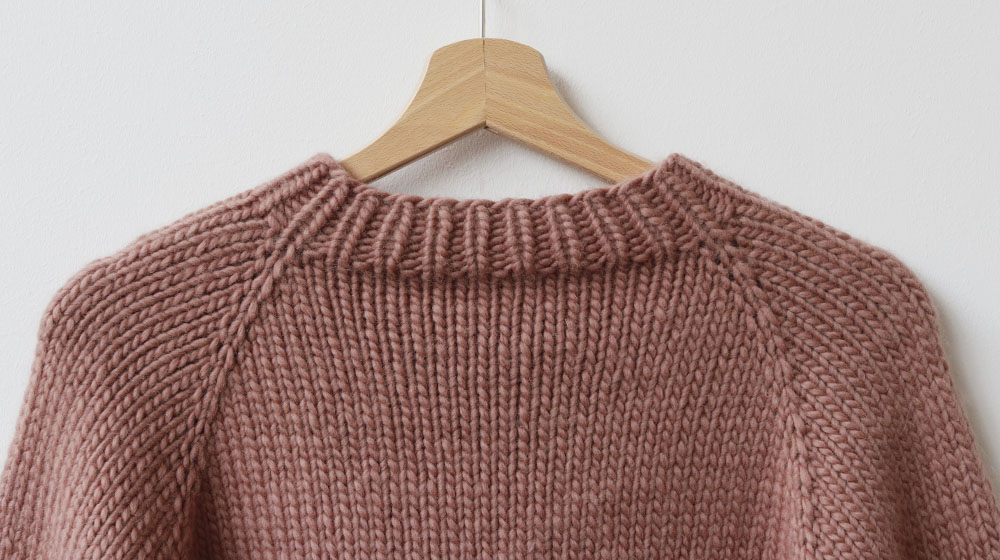
Hip hip hooray for Sweater Day! with a new edition, comes a new sweater. Here, just for you, is a free pattern to make a classic sweater with a diamond motif, but with a personality all of its own.
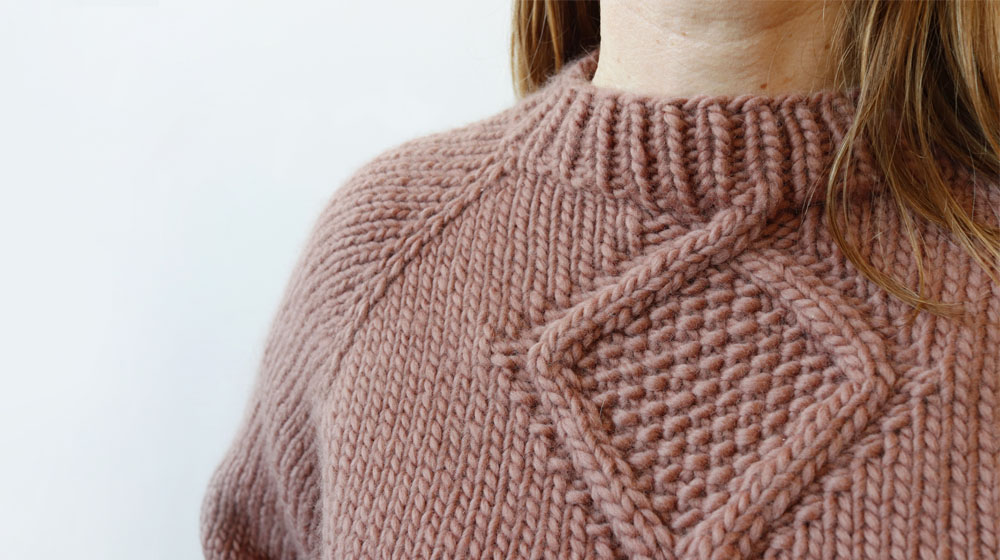
The central motif is created by small braids which gradually adopt the shape of large diamonds, which are adorned with a simple grain of rice. The final result is a chunky sweater with a modern cut and a that wears comfortably.
We wanted to offer a sweater for all occasions: that goes with trousers, with a long skirt, with sneakers, with boots. And the sisters from Knitting For Breakfast, creators of this exclusive design, have well and truly succeeded!
The yarn chosen for this project is Piuma in the colour of lace, a lightly twisted wick of pure wool. However, on our online store you can find many other colours from the Classics Collection, and also from the Printed and Tempera collections, these are truly wonderful!
MATERIALS
Piuma yarn col. Lace 600 g / 21.2 oz
Circular needles n° 7 EU
Circular needles n° 8 EU / 11 US
Cables 60 and 100 cm
Stitch markers
Wool needle
GAUGE
10 cm x 10 cm / 4" x 4"
13 stitches and 19 rows
STITCHES USED
Knit
Purl
Rib stitch 1/1:
knit 1 and purl 1, in the following row knit on the knitted stitch and purl 1 on the purled stitch
Intercalated Increase:
with the tip of the needle lift the horizontal thread between the two stitches and knit a twisted stitch inside
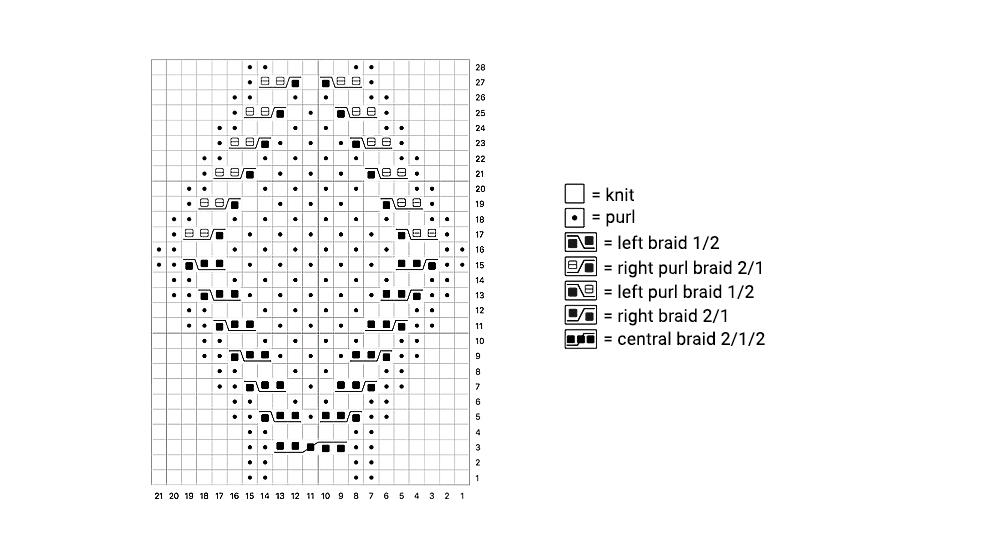
Right braid 2/1:
slip 1 stitch on the cable needle at the back of the piece, knit 2 and knit 1 from the cable needle
Left braid 1/2:
slip 1 stitch a on the cable needle on the front of the piece, knit 1, knit 2 from the cable needle
Right Purl Braid 2/1:
slip 1 stitch on the auxiliary needle at the back of the piece, knit 2, purl 1 from the auxiliary needle
Left Purl Braid 1/2:
slip 2 stitches on the cable needle on the front of the piece, purl 1 and knit 2 from the cable needle
Central braid 2/1/2:
slip 2 stitches on the auxiliary needle on the back, slip 1 stitch on a second auxiliary needle on the back, knit 2 stitches then knit the stitch from the second auxiliary needle, knit the 2 stitches from the first auxiliary needle.
DIMENSIONS OF FINISHED PIECE
Total length 54 cm / 21.3"
Width 106 cm / 41.7"
LEVEL OF DIFFICULTY
Easy
Worked in the round top down in one piece with raglan sleeves.
With circular needles n ° 7 EU cast on 50 stitches, insert the marker at the beginning of the round and close it taking care not to twist the work.
From round 1 to round 8: work rib stitch 1/1 as follows * knit 1, purl 1 *, repeat from * to * until the end of the round.
Switch to circular needle size 8 EU / 11 US.
Round 9 knit and insert the markers as follows: marker at start of round, knit 4 (sleeve), insert marker, knit 1, insert marker, knit 17 (back), insert marker, knit 1, insert marker, 4 stitches knit (sleeve), insert marker, knit 1, insert marker, knit 21 (front), insert marker, knit 1.
Now start the increases.
Round 10: 1 Intercalated Increase, knit until the stitch marker, 1 Intercalated Increase, pass the stitch marker, knit 1, pass the stitch marker, 1 Intercalated Increase, knit until the stitch marker, 1 Intercalated Increase, pass the stitch marker, knit 1, pass the stitch marker, 1 Intercalated Increase, knit until the stitch marker, 1 Intercalated Increase, pass the stitch marker, knit 1, pass the stitch marker, 1 Intercalated Increase, knit until the stitch marker, 1 Intercalated Increase, pass the stitch marker, knit 1 (8 stitches increased)
round 11: insert the 2 markers that delimit the central diamond pattern.
Within these stitch markers the PATTERN will be followed, from right to left and from bottom to top.
Choose different colour stitch markers than the increases to avoid confusion.
Insert the markers as follows.
Round 11: knit 6, pass the stitch marker, knit 1, pass the stitch marker, knit 19, pass the stitch marker, knit 1, pass the stitch marker, knit 6, pass the stitch marker, knit 1, pass the stitch marker, knit 1, insert the marker for the central motif, follow the pattern for 21 stitches, insert the second marker for the central motif, knit 1, pass the stitch marker, knit 1
round 12: 1 Intercalated Increase, knit until the stitch marker, 1 Intercalated Increase, pass the stitch marker, knit 1, pass the stitch marker, 1 Intercalated Increase, knit until the stitch marker, 1 Intercalated Increase, pass the stitch marker, knit 1, pass the stitch marker, 1 Intercalated Increase, knit until the stitch marker, 1 Intercalated Increase, pass the stitch marker, knit 1, pass the stitch marker, 1 Intercalated Increase, knit until the stitch marker of the central motif, pass the stitch marker of the central motif, follow the pattern for 21 stitches, pass the stitch marker of the central motif, knit until the stitch marker, 1 Intercalated Increase, pass the stitch marker, knit 1 (8 stitches increased)
round 13: knit all except the 21 stitches delimited by the two markers of the central motif.
Put the stitches that delimit the sleeves on a line.
Put the first 48 stitches on a thread (first sleeve), cast on 2 stitches for the underarm, remove the marker, knit 1, remove the marker, knit 61 stitches, remove the marker, knit 1, remove the marker, put 48 stitches on a thread (second sleeve), cast on 2 stitches for the underarm, remove the marker, knit 1, remove the marker, knit up to the marker of the central motif, follow the pattern for 21 stitches, knit up to the marker, remove the marker, knit 1.
Start working the body of the shirt, there are 134 stitches on the body.
For convenience, the numbering is resumed from number 1.
Round 1: knit all the stitches except the 21 stitches delimited by the two markers of the central motif.
Work as round 1 until the pattern is completed three times in total.
Knit one round.
Switch to circular needle size 7 EU.
Work 8 1/1 rib stitches as follows: * knit 1, purl 1 *, repeat from * to * to the end of the round.
Pick up the 48 stitches left hanging previously on circular needle size 8 EU / 11 US, pick up 2 stitches in the underarm, insert the marker at the beginning of the round and work in the round.
There are 50 stitches on the needles.
Knit 1 round.
Round of decreases: knit 2 together, knit up to 3 stitches before the end, 1 simple stitch passed over, knit 1.
Knit 10 rounds.
Round of decreases: knit 2 together, knit up to 3 stitches before the end, 1 simple stitch passed over, knit 1.
Knit 10 rounds.
Round of decreases: knit 2 together, knit up to 3 stitches before the end, 1 simple stitch passed over, knit 1.
Round of decreases: knit 2 together, knit up to 3 stitches before the end, 1 simple stitch passed over, knit 1.
Knit 9 rounds.
Round of decreases: knit 2 together, knit up to 3 stitches before the end, 1 simple stitch passed over, knit 1.
Knit 9 rounds.
Round of decreases: knit and evenly distribute 8 decreases (32 stitches).
Switch to circular needle size 7 EU.
Work 8 stitches in rib stitch 1/1 as follows: *knit 1, purl 1*, repeat from * to * to the end of the round.
Close all the links.
Insert all the threads, wash and fix the garment.
We have reached the end of this tutorial on how to knit a sweater with diamond motif, and if you have read up until now then you must have enjoyed it. For this reason we also suggest reading how to knit a cardigan with geometric motifs.


WRITE A COMMENT