
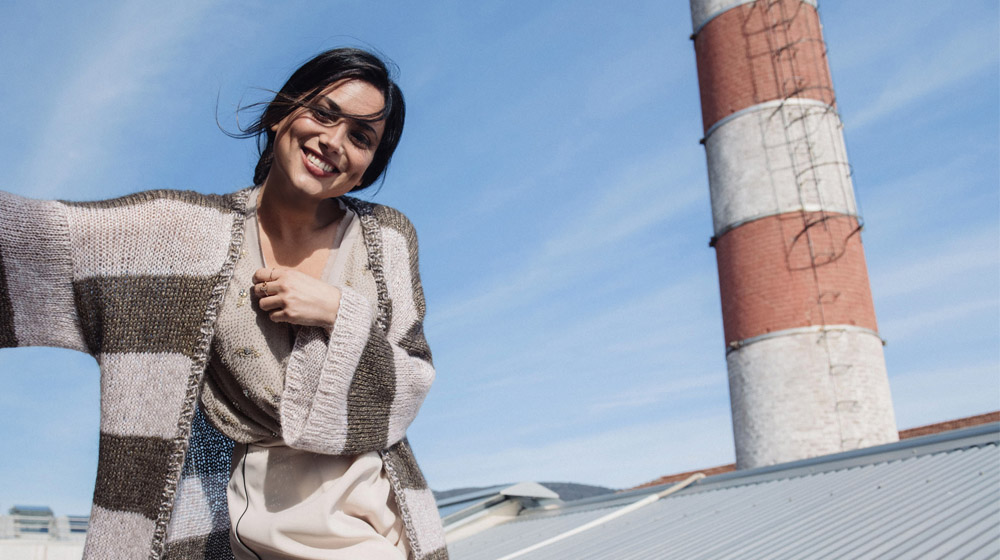
Looking for a soft and minimalist kimono cardigan? Look no further! New colours now available in our soft and warm Hokusai yarn. Weve decided to celebrate the growth of the collection with another free and exclusive pattern by Knitting For Breakfast. Its a really easy to make garment and ideal for spring and autumn, to wear with a pair of jeans but even over a dress during the day. Weve chosen to do it two-tone with thick stripes, but you can choose to repeat the stripes perhaps with different colours or go for a plain colour.
Let's get started straight away with the tutorial.

This kimono cardigan is worked with flat knitting needles back and forth. Were going to work the pieces separately, first the back then the two fronts and lastly the sleeves. The pieces will then be sewn together. Finally, the front hem will be picked up and made by a 2-ply yarn, one for each colour.
MATERIALS
Hokusai yarn col. Turtledove 300 g / 10.6 oz
Hokusai yarn col. Sand 300 g / 10.6 oz
Knitting needle n° 6.5 EU / 10.5 US
GAUGE
10 cm x 10 cm / 4" x 4" stockinette stitch worked flat
16 stitches x 16 rows
KNIT STITCHES USED
Cast on
Knit
Purl
Stockinette stitch:
odd rows: knit stitch all stitches
even rows: purl all stitches.
Rib stitch 1/1:
odd rows: knit 1 and purl 1 to the end of the row
even rows: work stitches as they appear.
One size loose fitting.

With colour 1 and n° 6.5 EU / 10.5 US knitting needles cast on 86 stitches.
Rib stitch 1/1 the first 6 rows.
From row 7 to 20 row: (still with colour 1) work all the rows using the stockinette stitch (14 rows).
Switch to colour 2
From row 21 to row 38: stockinette stitch all rows (18 rows)
Switch to colour 1
From row 39 to row 56: stockinette stitch all rows (18 rows)
Switch to colour 2
From row 57 to row 74: stockinette stitch all rows (18 rows)
Switch to colour 1
From row 75 to row 92: stockinette stitch all rows (18 rows)
Switch to colour 2
From row 93 to row 110: stockinette stitch all rows (18 rows)
Switch to colour 1
From row 111 to row 128: stockinette stitch all rows (18 rows)
Switch to colour 2
From row 129 to row 140: stockinette stitch all rows (12 rows)
Bind off loosely.
Remember to do like this for both sides of the kimono cardigan.
Using colour 1 and with n° 6.5 EU / 10.5 US knitting needles cast on 34 stitches.
Rib stitch 1/1 the first 6 rows.
From row 7 to row 20: (still colour 1) work all the rows using the stockinette stitch (14 rows).
Switch to colour 2
From row 21 to row 38: stockinette stitch all rows (18 rows)
Switch to colour 1
From row 39 to row 56: stockinette stitch all rows (18 rows)
Switch to colour 2
From row 57 to row 74: stockinette stitch all rows (18 rows)
Switch to colour 1
From row 75 to row 92: stockinette stitch all rows (18 rows)
Switch to colour 2
From row 93 to row 110: stockinette stitch all rows (18 rows)
Switch to colour 1
From row 111 to row 128: stockinette stitch all rows (18 rows)
Switch to colour 2
From row 129 to row 140: stockinette stitch all rows (12 rows)
Bind off loosely.
Repeat the whole of the second part for the front.
Below were going to explain how to make the sleeves of the kimono cardigan, remember youll need to repeat this step to get both sleeves.
Using colour 1 and n° 6.5 EU / 10.5 US knitting needles cast on 76 stitches.
Rib stitch 1/1 the first 4 rows.
From row 5 to row 18: (still with colour 1) stockinette stitch all rows (14 rows).
Switch to colour 2
From row 19 to row 36: stockinette stitch all rows (18 rows)
Switch to colour 1
From row 37 to row 54: stockinette stitch all rows (18 rows)
Bind off softly.
Firstly, sew the shoulders like this: position one at the front and one at the back, the right sides facing each other, and sew the two parts together (34 stitches) using the same yarn as the work.
Repeat the same thing for the other shoulder.
Now join the sleeves of the kimono cardigan together. Sew the first sleeve by lining the centre of the sleeve up with the shoulder seam. Repeat for the other sleeve.
Here, we sew up the sides of the kimono cardigan and the sleeves in this way: align the sides of the kimono cardigan up to the sleeves and sew them together with an invisible seam. Repeat everything for the other side.
To finish off the central hem of the kimono cardigan, pick up along the sides of the front and the neckline (behind) 198 stitches on n° 6.5 EU / 10.5 US knitting needles and work with the two threads together (one for each colour) as follows: work 3 rows of the rib stitch 1/1.
Bind off loosely and thread in all the threads.
Want another pattern for a pure wool sweater with a special pattern? The sweater with the cable bobble stitch is for you!


WRITE A COMMENT