
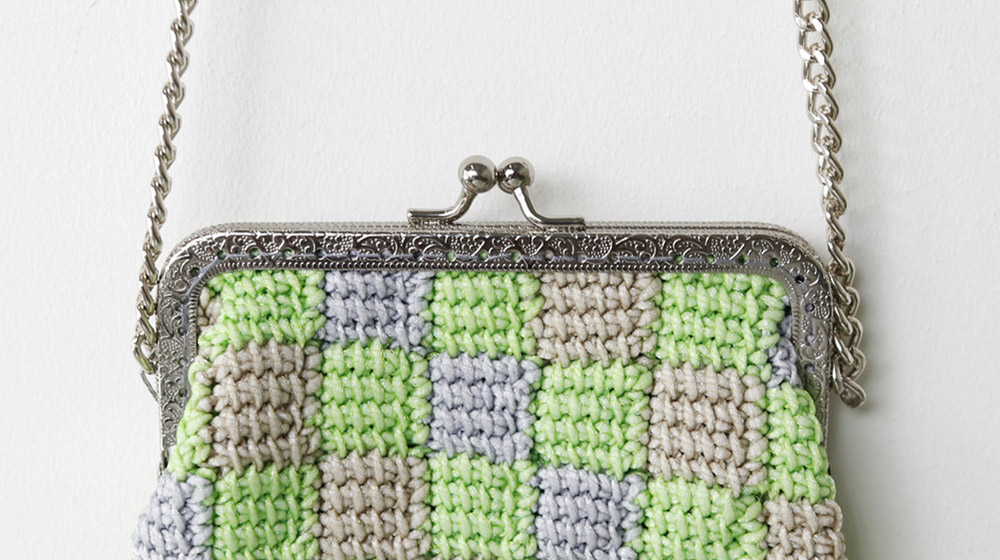
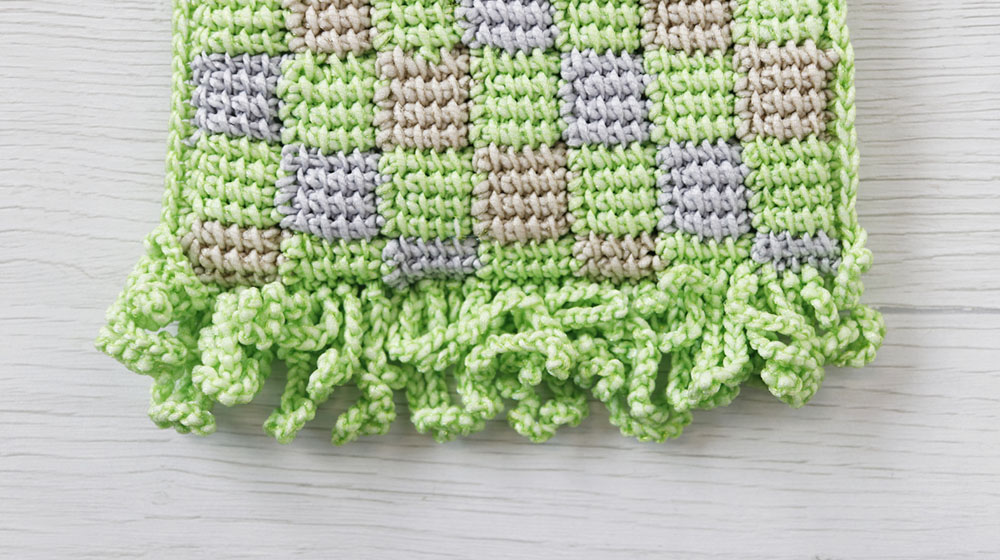
This handbag has a little bit of a gypsy soul. With its checkered pattern, kiss clasp and small fringes that transform into whimsical curls. Its perfect for the daytime and for carrying only the most useful things with you. Made with Tunisian crochet and entrelac stitch, worked from corner to corner. The project is not for beginners and may be ideal for becoming familiar with the entrelac stitch. You can also use a classic crochet hook if you so choose.
The yarn chosen for this project is Ghost. A smooth, flat, bright, silky and crunchy ribbon that glides between the fingers and is very pleasant to work with because it flows well. Highly recommended for creating 4 season accessories, jewellery and Interior Design projects. Head over to our store and choose the colours you prefer.
And now, let's get going. We also recommend lining the bag once completed.
MATERIALS
Ghost yarn col. Caipirinha, Gold, Silver, about 90 g / 3.2 oz in total
Tunisian crochet hook n° 3 EU / 4 US
Kiss clasp for bag size with shoulder strap rings
Chain shoulder strap
Wool needle
GAUGE SIMPLE TUNISIAN STITCH
10 cm x 10 cm / 4" x 4"
25 stitches and 16 rows forward and back
STITCHES USED
Chain
Slip stitch
Single crochet
Simple Tunisian crochet:
In the simple Tunisian crochet, each row is made up of a forward and a return. On the outward part, the stitches are worked and on the return they are closed two by two.
DIMENSIONS OF FINISHED PIECE FRINGES EXCLUDED
Width approximately 17.5 cm / 7"
Height approx. 26 cm / 10.2"
DIFFICULTY
Difficult
The bag is a rectangle made up of 147 small squares in 3 alternating colours, subsequently closed on the sides by working 1 row in single crochet. Each small square is worked separately with a simple Tunisian stitch with the entrelac technique, so starting from the 2nd square each square joins the previous one, the one below it or both. We proceed diagonally, one colour at a time. The diagram shows the order of working of the squares (numbered from 1 to 147), the colour to use and how to work based on the position occupied: there are 4 ways and are shown below.
Q1 Initial square
Using Tunisian crochet hook n° 3 EU / 4 US and the colour indicated, softly cast on 6 chains.
Basic forward row: enter with the hook into the 2nd chain, discard in the thread and extract 1 stitch, repeat (enter with the hook over the next chain, discard in the thread and extract 1 stitch) on each subsequent chain. You have 6 stitches on the hook
basic return row: work 1 initial chain, then close the stitches two by two, until you are left with only 1 stitch, which becomes the first of the next row
row 1 forward: enter with the crochet hook into the 1st vertical thread below, discard the thread and extract 1 stitch, repeat (enter with the crochet hook into the vertical thread below, discard the thread and extract 1 stitch) in each vertical thread below
return row 1: work 1 initial chain, then close the stitches two by two, until you are left with just 1 stitch, which becomes the first of the next row.
The forward row 1 and the return row 1 set the simple Tunisian stitch, repeat them twice more: you have worked a total of 4 forward and return rows, including the base row. Bind off as follows: enter with the crochet hook into the 1st vertical thread below, yarn over and close the 2 stitches on the hook forming 1 slip stitch, repeat (enter with the crochet hook into the 1st vertical thread below, discard the thread and close the 2 stitches on the hook) to the end of the row. Cut and secure the thread.
Q2 Square joined to the previous square
With Tunisian crochet hook n° 3 EU / 4 US, secure the thread of the colour indicated with 1 slip stitch in the corresponding chain of the starting chains of the previous square, then loosely cast on 5 chains. On the 6 stitches work as stated for Q1 square but, on the left side, hook with 1 slip stitch in the corresponding row of the previous square. Bind off in the same way, hooking with 1 slip stitch in the final row of the previous square. Do not cut the thread: the remaining stitch will be the starting stitch of the next square.
Q3 Square joined to the square below
With the same thread as the previous square, work 1 forward row of the simple Tunisian stitch on the underlying square (already worked) as follows: enter the first vertical thread of the underlying square with the hook, discard the thread and extract 1 stitch, repeat ( enter with the crochet hook into the following vertical thread of the square below, discard the thread and extract 1 stitch) in each vertical thread of the square below. Continue with the return row, then work another 3 rows forward and back. Bind off the work as stated for square Q1, then cut and secure the thread.
Q4 Square joined to the square below and to the previous one
With the same thread as the previous square, work 1 forward row of the simple Tunisian stitch on the underlying square (already worked) as follows: enter the first vertical thread of the underlying square with the hook, discard the thread and extract 1 stitch, repeat ( enter with the crochet hook into the following vertical thread of the square below, discard the thread and extract 1 stitch) in each vertical thread of the square below, hook with 1 slip stitch in the corresponding row of the previous square.
You have 6 stitches on the hook. Continue with the return row, then work another 3 rows forward and back. At the same time, on the left side, hook with 1 slip stitch in the corresponding row of the previous square. Bind off as stated for square Q2. Do not cut the thread: the remaining stitch will be the starting stitch of the next square. However, when you work the final squares of the diagonals at the top right (Q4 squares numbers 132, 137, 141, 144, 146 and 147), after closing the work, cut and secure the thread.
PROCEDURE
Work the small squares following the diagram and instructions below.
Square 1: using grey follow the explanation of square Q1 (initial square)
square 2: using green follow the explanation of square Q2 (square joined to the previous square)
square 3: using green follow the explanation of square Q3 (square joined to the square below)
square 4: using beige follow the explanation of square Q2
square 5: using beige follow the explanation of square Q4 (square joined to the square below and to the previous one)
square 6: using beige follow the explanation of square Q3
square 7: using green follow the explanation of square Q2
squares 8 and 9: using green follow the explanation of square Q4
square 10: using green follow the explanation of square Q3
square 11: using grey follow the explanation of square Q2
squares 12, 13 and 14: using grey follow the explanation of square Q4
square 15: using grey follow the explanation of square Q3
square 16: using green follow the explanation of square Q2
squares from 17 to 20: using green follow the explanation of square Q4
square 21: using green follow the explanation of square Q3
square 22: using beige follow the explanation of square Q2
squares from 23 to 27: using beige follow the explanation of square Q4
square 28: using beige follow the explanation of square Q3
squares from 29 to 34: using green follow the explanation of square Q4
square 35: using green follow the explanation of the square of square Q3
squares from 36 to 41: using grey follow explanation Q4
square 42: using grey follow the explanation of square Q3
squares from 43 to 48: using green follow the explanation of square Q4
square 49: using green follow the explanation of square Q3
squares from 50 to 55: using beige follow the explanation of square Q4
square 56: using beige follow the explanation of square Q3
squares from 57 to 62: using green follow the explanation of square Q4
square 63: using green follow the explanation of square Q3
squares from 64 to 69: using grey follow the explanation of square Q4
square 70: using grey follow the explanation of square Q3
squares from 71 to 76: using green follow the explanation of square Q4
square 77: using green follow the explanation of square Q3
squares from 78 to 83: using beige follow the explanation of square Q4
square 84: using beige follow the explanation of square Q3
squares from 85 to 90: using green follow explanation Q4
square 91: using green follow the explanation of square Q3
squares from 92 to 97: using grey follow the explanation of square Q4
square 98: using grey follow the explanation of square Q3
squares from 99 to 104: using green follow the explanation of square Q4
square 105: using green follow the explanation of square Q3
squares from 106 to 111: using beige follow the explanation of square Q4
square 112: using beige follow the explanation of square Q3
squares from 113 to 118: using green follow the explanation of square Q4
square 119: using green follow the explanation of square Q3
squares from 120 to 125: using grey follow the explanation of square Q4
square 126: using grey follow the explanation of square Q3.
Now, still following the explanation of square Q4, work the following squares alternating colours as follows:
squares 127 to 132: green
squares from 133 to 137: beige
squares 138 to 141: green
squares 142, 143 and 144: grey
squares 145 and 146: green
square 147: beige.

Fold the rectangle created in half lengthwise and join the sides, carrying out 1 row in single crochet using green with the Tunisian hook n° 3 EU / 4 US as follows: repeat (insert the hook first in the end of row on one side then in the end of the corresponding row on the other side, discard the thread and extract 1 stitch, discard the thread and close the 2 stitches) until the entire side is closed; repeat for the other side. With the Tunisian crochet hook no. 3 EU / 4 US and the green yarn, make some chain fringes on the bottom of the bag as follows: secure the thread with 1 slip stitch in the 1st stitch, work 18 chains, then work 1 slip stitch in the initial slip stitch, repeat (1 slip stitch in the next stitch, 18 chains, 1 slip stitch in the slip stitch) in each subsequent stitch in the row (or every other stitch for less dense fringes). Cut and secure the thread. Curling slightly, sew the closure to the top of the bag. Attach the shoulder strap.


WRITE A COMMENT